Docker Security
If you are a Software Developer/DevOps Engineer working with Docker, and are one of those types that take their profession seriously (hint: most people that call themselves Engineers do), believe that if a job is worth doing, it’s worth doing well, take quality, good design, and security seriously, then I may have just the book you’ve been looking for. 😌
I recently released a book on Docker Security, which addresses many of the concerns with the default level of security around Docker and Docker deployments. The book is purposed to help Software Developers/DevOps Engineers address these concerns quickly. The following is a snapshot of what’s included in the book:
| 1 | Habitat |
|---|---|
| Consumption from Registries | |
| Doppelganger images | |
| The Default User is Root ⭐ | |
| 2 | Hardening Docker Host, Engine and Containers ⭐ |
| Haskell Dockerfile Linter | |
| Lynis | |
| Docker Bench | |
| CoreOS Clair | |
| Banyanops collector | |
| Anchore | |
| TwistLock ⭐ | |
| Possible contenders to watch | |
| Namespaces (Risks) ⭐ | |
| Namespaces (Countermeasures ⭐) | |
| Control Groups (Risks) | |
| Control Groups (Countermeasures) | |
| Capabilities (Risks) | |
| Capabilities (Countermeasures) | |
| Linux Security Modules (Risks) | |
| Linux Security Modules (Countermeasures) | |
| SecComp (Risks) | |
| SecComp (Countermeasures) | |
| Read-only Containers ⭐ | |
| 3 | runC and Where it Fits in ⭐ |
| Using runC Standalone | |
| 4 | Application Security |
| Additional Resources ⭐ |
⭐ I’ve provided a few of the sections from the book below, and linked to from the book contents above. Enjoy 😃
Oh, and for less than the cost of a lunch you can own the complete book
The Default User is Root

What is worse, Docker’s default is to run containers, and all commands / processes within a container as root. This can be seen by running the following command from the CIS_Docker_1.13.0_Benchmark:
Query User running containers
docker ps --quiet | xargs docker inspect --format '{{ .Id }}: User={{ .Config.User }}'If you have two containers running, and the user has not been specified, you will see something like the below, which means your two containers are running as root.
Result of user running containers output
<container n Id>: User=
<container n+1 Id>: User=
Images derived from other images inherit the same user defined in the parent image explicitly or implicitly, so unless the image creator has specifically defined a non-root user, the user will default to root. That means all processes within the container will run as root.

In order to run containers as a non-root user, the user needs to be added in the base image (Dockerfile) if it is under your control, and set before any commands you want run as a non-root user. Here is an example of the NodeGoat image:
NodeGoat Dockerfile
 1FROM node:4.4
 2
 3# Create an environment variable in our image for the non-root user we want to use.
 4ENV user nodegoat_docker
 5ENV workdir /usr/src/app/
 6
 7# Home is required for npm install. System account with no ability to login to shell
 8RUN useradd --create-home --system --shell /bin/false $user
 9
10RUN mkdir --parents $workdir
11WORKDIR $workdir
12COPY package.json $workdir
13
14# chown is required by npm install as a non-root user.
15RUN chown $user:$user --recursive $workdir
16# Then all further actions including running the containers should
17# be done under non-root user, unless root is actually required.
18USER $user
19
20RUN npm install
21COPY . $workdir
22
23# Permissions need to be reapplied, due to how docker applies root to new files.
24USER root
25RUN chown $user:$user --recursive $workdir
26RUN chmod --recursive o-wrx $workdir
27
28RUN ls -liah
29RUN ls ../ -liah
30USER $user
As you can see on line 4 we create our nodegoat_docker user.
On line 8 we add our non-root user to the image with no ability to login.
On line 15 we change the ownership of the $workdir so our non-root user has access to do the things that we normally have permissions to do without root, such as installing npm packages and copying files, as we see on line 20 and 21. But first we need to switch to our non-root user on line 18. On lines 25 and 26 we need to reapply ownership and permissions due to the fact that docker does not COPY according to the user you are set to run commands as.
Without reapplying the ownership and permissions of the non-root user as seen above on lines 25 and 26, the container directory listings would look like this:
No reapplication of ownership and permissions
Step 12 : RUN ls -liah
 ---> Running in f8692fc32cc7
total 116K
13 drwxr-xr-x   9 nodegoat_docker nodegoat_docker 4.0K Sep 13 09:00 .
12 drwxr-xr-x   7 root            root            4.0K Sep 13 09:00 ..
65 drwxr-xr-x   8 root            root            4.0K Sep 13 08:59 .git
53 -rw-r--r--   1 root            root             178 Sep 12 04:22 .gitignore
69 -rw-r--r--   1 root            root            1.9K Nov 21  2015 .jshintrc
61 -rw-r--r--   1 root            root              55 Nov 21  2015 .nodemonignore
58 -rw-r--r--   1 root            root             715 Sep 13 08:59 Dockerfile
55 -rw-r--r--   1 root            root            6.6K Sep 12 04:16 Gruntfile.js
60 -rw-r--r--   1 root            root             11K Nov 21  2015 LICENSE
68 -rw-r--r--   1 root            root              48 Nov 21  2015 Procfile
64 -rw-r--r--   1 root            root            5.6K Sep 12 04:22 README.md
56 drwxr-xr-x   6 root            root            4.0K Nov 21  2015 app
66 -rw-r--r--   1 root            root             527 Nov 15  2015 app.json
54 drwxr-xr-x   3 root            root            4.0K May 16 11:41 artifacts
62 drwxr-xr-x   3 root            root            4.0K Nov 21  2015 config
57 -rw-r--r--   1 root            root             244 Sep 13 04:51 docker-compose.yml
67 drwxr-xr-x 498 root            root             20K Sep 12 03:50 node_modules
63 -rw-r--r--   1 root            root            1.4K Sep 12 04:22 package.json
52 -rw-r--r--   1 root            root            4.6K Sep 12 04:01 server.js
59 drwxr-xr-x   4 root            root            4.0K Nov 21  2015 test
 ---> ad42366b24d7
Removing intermediate container f8692fc32cc7
Step 13 : RUN ls ../ -liah
 ---> Running in 4074cc02dd1d
total 12K
12 drwxr-xr-x  7 root            root            4.0K Sep 13 09:00 .
11 drwxr-xr-x 32 root            root            4.0K Sep 13 09:00 ..
13 drwxr-xr-x  9 nodegoat_docker nodegoat_docker 4.0K Sep 13 09:00 app
With reapplication of the ownership and permissions of the non-root user, as the Dockerfile is currently above, the container directory listings look like the following:
With reapplication of ownership and permissions
Step 15 : RUN ls -liah
 ---> Running in 8662e1657d0f
total 116K
13 drwxr-x---   21 nodegoat_docker nodegoat_docker 4.0K Sep 13 08:51 .
12 drwxr-xr-x    9 root            root            4.0K Sep 13 08:51 ..
65 drwxr-x---   20 nodegoat_docker nodegoat_docker 4.0K Sep 13 08:51 .git
53 -rw-r-----    1 nodegoat_docker nodegoat_docker  178 Sep 12 04:22 .gitignore
69 -rw-r-----    1 nodegoat_docker nodegoat_docker 1.9K Nov 21  2015 .jshintrc
61 -rw-r-----    1 nodegoat_docker nodegoat_docker   55 Nov 21  2015 .nodemonignore
58 -rw-r-----    1 nodegoat_docker nodegoat_docker  884 Sep 13 08:46 Dockerfile
55 -rw-r-----    1 nodegoat_docker nodegoat_docker 6.6K Sep 12 04:16 Gruntfile.js
60 -rw-r-----    1 nodegoat_docker nodegoat_docker  11K Nov 21  2015 LICENSE
68 -rw-r-----    1 nodegoat_docker nodegoat_docker   48 Nov 21  2015 Procfile
64 -rw-r-----    1 nodegoat_docker nodegoat_docker 5.6K Sep 12 04:22 README.md
56 drwxr-x---   14 nodegoat_docker nodegoat_docker 4.0K Sep 13 08:51 app
66 -rw-r-----    1 nodegoat_docker nodegoat_docker  527 Nov 15  2015 app.json
54 drwxr-x---    5 nodegoat_docker nodegoat_docker 4.0K Sep 13 08:51 artifacts
62 drwxr-x---    5 nodegoat_docker nodegoat_docker 4.0K Sep 13 08:51 config
57 -rw-r-----    1 nodegoat_docker nodegoat_docker  244 Sep 13 04:51 docker-compose.yml
67 drwxr-x--- 1428 nodegoat_docker nodegoat_docker  20K Sep 13 08:51 node_modules
63 -rw-r-----    1 nodegoat_docker nodegoat_docker 1.4K Sep 12 04:22 package.json
52 -rw-r-----    1 nodegoat_docker nodegoat_docker 4.6K Sep 12 04:01 server.js
59 drwxr-x---    8 nodegoat_docker nodegoat_docker 4.0K Sep 13 08:51 test
 ---> b88d816315b1
Removing intermediate container 8662e1657d0f
Step 16 : RUN ls ../ -liah
 ---> Running in 0ee2dcc889a6
total 12K
12 drwxr-xr-x  9 root            root            4.0K Sep 13 08:51 .
11 drwxr-xr-x 34 root            root            4.0K Sep 13 08:51 ..
13 drwxr-x--- 21 nodegoat_docker nodegoat_docker 4.0K Sep 13 08:51 app
An alternative to setting the non-root user in the Dockerfile is to set it in the docker-compose.yml, provided that the non-root user has been added to the image in the Dockerfile. In the case of NodeGoat, the mongo Dockerfile is maintained by DockerHub, and it adds a user called mongodb. In the NodeGoat projects docker-compose.yml, we just need to set the user, as seen on line 13 below:
NodeGoat docker-compose.yml
 1    version: "2.0"
 2
 3    services:
 4      web:
 5        build: .
 6        command: bash -c "node artifacts/db-reset.js && npm start"
 7        ports:
 8          - "4000:4000"
 9        links:
10          - mongo
11      mongo:
12        image: mongo:latest
13        user: mongodb
14        expose:
15          - "27017"
Alternatively, a container may be run as a non-root user by running the following command:
docker run -it --user lowprivuser myimagebut this is not ideal, the specific user should usually be part of the build.
Hardening Docker Host, Engine and Containers

Considering that these processes run as root, and have indirect access to most of the Linux Kernel (20+ million lines of code written by humans) APIs, such as networking, USB, storage stacks, and others via System calls, the situation may look bleak.
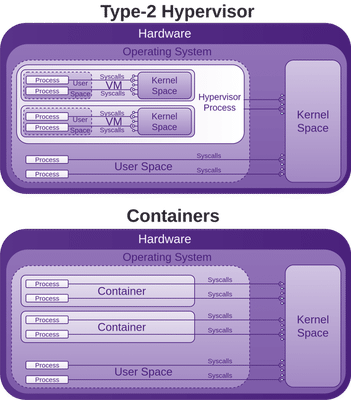
System calls are how programmes access the kernel to perform tasks. This attack surface is huge, and all before any security is added on top in the form of LXC, libcontainer (now opencontainers/runc), or Linux Security Modules (LSM) such as AppArmor or SELinux. These are often seen as an annoyance and just disabled like many other forms of security.
If you run a container, you may have to install kmod, then run lsmod in the container, and also on the host system. You will see that the same modules are loaded, this is because as mentioned, the container shares the host kernel, so there is not a lot between processes within the container and the host kernel. As mentioned above, the processes within the container may be running as root as well, it pays for you to have a good understanding of the security features Docker provides, and how to employ them.
The Seccomp section below discusses Docker’s attempt to put a stop to some System calls accessing the kernel APIs. There are also many other features that Docker has added or leveraged in terms of mitigating a lot of this potential abuse. Although the situation initially looks bad, Docker has done a lot to improve it.
As you can see in the above image, the host kernel is open to receiving potential abuse from containers. Make sure you keep it patched. We will now walk though many areas of potential abuse.

Make sure you keep your host kernel well patched, as it is a huge attack surface, with all of your containers accessing it via System calls.
The space for tooling to help find vulnerabilities in code, packages, etc within your Docker images has been noted, and tools provided. The following is a sorted list of what feels like does the least and is the simplest in terms of security/hardening features to what does the most, not understating tools that do a little, but do it well.
These tools should form a part of your secure and trusted build pipeline, or software supply-chain.
TwistLock
TwistLock is a fairly comprehensive and complete proprietary offering with a free developer edition. The following details were taken from TwistLock marketing pages:
Features of Trust:
- Discover and manage vulnerabilities in images
- Uses CVE data sources similar to CoreOS Clair
- Can scan registries: Docker Hub, Google Container Registry, EC2 Container Registry, Artifactory, Nexus Registry, and images for vulnerabilities in code and configuration
- Enforce and verify standard configurations
- Hardening checks on images based on CIS Docker benchmark
- Real-time vulnerability and threat intelligence
- Provide out-of-box plugins for vulnerability reporting directly into Jenkins and TeamCity
- Provides a set of APIs for developers to access almost all of the TwistLock core functions
Features of Runtime:
- Policy enforcement
- Detect anomalies, uses open source CVE feeds, commercial threat and vulnerability sources, as well as TwistLock’s own Lab research
- Defend and adapt against active threats and compromises using machine learning
- Governs access control to individual APIs of Docker Engine, Kubernetes, and Docker Swarm, providing LDAP/AD integration.
Namespaces (Risks)
The first place to read for solid background on Linux kernel namespaces is the man-page, otherwise I’d just be repeating what is there. A lot of what follows about namespaces requires some knowledge from the namespaces man-page, so do yourself a favour and read it first.
Linux kernel namespaces were first added between 2.6.15 (January 2006) and 2.6.26 (July 2008).
According to the namespaces man page, IPC, network and UTS namespace support was available from kernel version 3.0, while mount, PID and user namespace support was available from kernel version 3.8 (February 2013), and cgroup namespace support was available from kernel version 4.6 (May 2016).
Each aspect of a container runs in a separate namespace and its access is limited to that namespace.
Docker leverages the Linux (kernel) namespaces which provide an isolated workspace wrapped with a global system resource abstraction. This makes it appear to the processes within the namespace that they have their own isolated instance of the global resource. When a container is run, Docker creates a set of namespaces for that container, providing a layer of isolation between containers:
-
mnt: (Mount) Provides filesystem isolation by managing filesystems and mount points. Themntnamespace allows a container to have its own isolated set of mounted filesystems, the propagation modes can be one of the following: [r]shared, [r]slaveor [r]private. Thermeans recursive.If you run the following command, then the host’s mounted
host-pathis shared with all others that mounthost-path. Any changes made to the mounted data will be propagated to those that use thesharedmode propagation. Usingslavemeans only the master (host-path) is able to propagate changes, not vice-versa. Usingprivatewhich is the default, will ensure no changes can be propagated.Mounting volumes in shared mode propagation
docker run <run arguments> --volume=[host-path:]<container-path>:[z][r]shared <container image name or id> <command> <args...>If you omit the
host-pathyou can see the host path that was mounted when running the following command:Query
docker inspect <name or id of container>Find the “Mounts” property in the JSON produced. It will have a “Source” and “Destination” similar to:
Result
...
"Mounts": [
  {
    "Name": "<container id>",
    "Source": "/var/lib/docker/volumes/<container id>/_data",
    "Destination": "<container-path>",
    "Mode": "",
    "RW": true,
    "Propagation": "shared"
  }
]
...
An empty string for Mode means that it is set to its read-write default. For example, a container can mount sensitive host system directories such as
/,/boot,/etc,/lib,/proc,/sys, along with the rest as I discuss in the Lock Down the Mounting of Partitions section of my book Fascicle 1 of Holistic Info-Sec for Web Developers, particularly if that advice is not followed. If it is followed, you have some defence in depth working for you, and although Docker may have mounted a directory as read-write, the underlying mount may be read-only, thus stopping the container from being able to modify files in these locations on the host system. If the host does not have the above directories mounted with constrained permissions, then we are relying on the user running any given Docker container that mounts a sensitive host volume to mount it as read-only. For example, after the following command has been run, users within the container can modify files in the hosts/etcdirectory:Vulnerable mount
docker run -it --rm -v /etc:/hosts-etc --name=lets-mount-etc ubuntuQuery
docker inspect -f "{{ json .Mounts }}" lets-mount-etcResult
[
  {
    "Type":"bind",
    "Source":"/etc",
    "Destination":"/hosts-etc",
    "Mode":"",
    "RW":true,
    "Propagation":""
  }
]
Also keep in mind that, by default, the user in the container, unless otherwise specified, is root, the same root user as on the host system.
Labelling systems such as Linux Security Modules (LSM) require that the contents of a volume mounted into a container be labelled. This can be done by adding the
z(as seen in above example) orZsuffix to the volume mount. Thezsuffix instructs Docker to share the mounted volume with other containers, and in so doing, Docker applies a shared content label. Alternatively, if you provide theZsuffix, Docker applies a private unshared label, which means only the current container can use the mounted volume. Further details can be found at the dockervolumes documentation. This is something to keep in mind if you are using LSM, and have a process inside your container that is unable to use the mounted data.
--volumes-fromallows you to specify a data volume from another container.
You can also mount your Docker container mounts on the host by doing the following:mount --bind /var/lib/docker/<volumes>/<container id>/_data </path/on/host> -
PID: (Process ID) Provides process isolation, separates container processes from host and other container processes.
The first process that is created in a newPIDnamespace is the “init” process withPID1, which assumes parenthood of the other processes within the samePIDnamespace. WhenPID1 is terminated, so are the rest of the processes within the samePIDnamespace.
PIDnamespaces are hierarchically nested in ancestor-descendant relationships to a depth of up to 32 levels. AllPIDnamespaces have a parent namespace, other than the initial rootPIDnamespace of the host system. That parent namespace is thePIDnamespace of the process that created the child namespace.
Within aPIDnamespace, it is possible to access (make system calls to specificPIDs) all other processes in the same namespace, as well as all processes of descendant namespaces. However, processes in a childPIDnamespace cannot see processes that exist in the parentPIDnamespace or further removed ancestor namespaces. The direction any process can access another process in an ancestor/descendantPIDnamespace is one way.
Processes in differentPIDnamespaces can have the samePID, because thePIDnamespace isolates thePIDnumber space from otherPIDnamespaces.
Docker takes advantage ofPIDnamespaces. Just as you would expect, a Docker container can not access the host system processes, and process Ids that are used in the host system can be reused in the container, includingPID1, by being reassigned to a process started within the container. The host system can however access all processes within its containers, because as stated above,PIDnamespaces are hierarchically nested in parent-child relationships. Processes in the hostsPIDnamespace can access all processes in their own namespace down to thePIDnamespace that was responsible for starting the process, such as the process within the container in our case.
The default behaviour can however be overridden to allow a container to be able to access processes within a sibling container, or the hostsPIDnamespace. Example:Syntax
--pid=[container:<name|id>],[host]Example
# Provides access to the `PID` namespace of container called myContainer
# for container created from myImage.
docker run --pid=container:myContainer myImage
Example
# Provides access to the host `PID` namespace for container created from myImage
docker run --pid=host myImage
As an aside,
PIDnamespaces give us the functionality of: “suspending/resuming the set of processes in the container and migrating the container to a new host while the processes inside the container maintain the same PIDs.” with a handful of commands:Example
docker container pause myContainer [mySecondContainer...] docker export [options] myContainer # Move your container to another host. docker import [OPTIONS] file|URL|- [REPOSITORY[:TAG]] docker container unpause myContainer [mySecondContainer...] -
net: (Networking) Provides network isolation by managing the network stack and interfaces. It’s also essential to allow containers to communicate with the host system and other containers. Network namespaces were introduced into the kernel in 2.6.24, January 2008, with an additional year of development they were considered largely done. The only real concern here is understanding the Docker network modes and communication between containers. This is discussed in the Countermeasures.
-
UTS: (Unix Timesharing System) Provides isolation of kernel and version identifiers.
UTS is the sharing of a computing resource with many users, a concept introduced in the 1960s/1970s.
A UTS namespace is the set of identifiers returned byuname, which include the hostname and the NIS domain name. Any processes which are not children of the process that requested the clone will not be able to see any changes made to the identifiers of the UTS namespace.
If theCLONE_NEWUTSconstant is set, then the process being created will be created in a new UTS namespace with the hostname and NIS domain name copied and able to be modified independently from the UTS namespace of the calling process.
If theCLONE_NEWUTSconstant is not set, then the process being created will be created in the same UTS namespace of the calling process, thus able to change the identifiers returned byuname.
When a container is created, a UTS namespace is copied (CLONE_NEWUTSis set)(--uts="") by default, providing a UTS namespace that can be modified independently from the target UTS namespece it was copied from.
When a container is created with--uts="host", a UTS namespace is inherited from the host, the--hostnameflag is invalid.
-
IPC: (InterProcess Communication) manages access to InterProcess Communications).IPCnamespaces isolate your container’s System V IPC and POSIX message queues, semaphores, and named shared memory from those of the host and other containers, unless another container specifies on run that it wants to share your namespace. It would be a lot safer if the producer could specify which consuming containers could use its namespace. IPC namespaces do not include IPC mechanisms that use filesystem resources such as named pipes.
According to the namespaces man page: “Objects created in an IPC namespace are visible to all other processes that are members of that namespace, but are not visible to processes in other IPC namespaces.”
Although sharing memory segments between processes provide Inter-Process Communications at memory speed, rather than through pipes or worse, the network stack, this produces a significant security concern.
By default a container does not share the host’s or any other container’s IPC namespace. This behaviour can be overridden to allow a (any) container to reuse another container’s or the host’s message queues, semaphores, and shared memory via their IPC namespace. Example:Syntax
# Allows a container to reuse another container's IPC namespace.
--ipc=[container:<name|id>],[host]
Example
docker run -it --rm --name=container-producer ubuntu
root@609d19340303:/#

# Allows the container named container-consumer to share the IPC namespace
# of container called container-producer.
docker run -it --rm --name=container-consumer --ipc=container:container-producer ubuntu
root@d68ecd6ce69b:/#
Now find the Ids of the two running containers:
Query
docker inspect --format="{{ .Id }}" container-producer container-consumerResult
609d193403032a49481099b1fc53037fb5352ae148c58c362ab0a020f473c040
d68ecd6ce69b89253f7ab14de23c9335acaca64d210280590731ce1fcf7a7556
You can see from using the command supplied by the CIS_Docker_1.13.0_Benchmark that
container-consumeris using the IPC namespace ofcontainer-producer:Query
docker ps --quiet --all | xargs docker inspect --format '{{ .Id }}: IpcMode={{ .HostConfig.IpcMode }}'Result
d68ecd6ce69b89253f7ab14de23c9335acaca64d210280590731ce1fcf7a7556: IpcMode=container:container-producer
609d193403032a49481099b1fc53037fb5352ae148c58c362ab0a020f473c040: IpcMode=
When the last process in an IPC namespace terminates, the namespace will be destroyed along with all IPC objects in the namespace.
-
user: Not enabled by default. Allows a process within a container to have a unique range of user and group Ids within the container, known as the subordinate user and group Id feature in the Linux kernel. These do not map to the same user and group Ids of the host, container users to host users are remapped. For example, if a user within a container is root, which it is by default unless a specific user is defined in the image hierarchy, it will be mapped to a non-privileged user on the host system.
Docker considers user namespaces to be an advanced feature. There are currently some Docker features that are incompatible with using user namespaces, and according to the CIS Docker 1.13.0 Benchmark, functionalities that are broken if user namespaces are used. the Docker engine reference provides additional details around known restrictions of user namespaces.
If your containers have a predefined non-root user, then, currently, user namespaces should not be enabled, due to possible unpredictable issues and complexities, according to “2.8 Enable user namespace support” of the CIS Docker Benchmark.
The problem is that these mappings are performed on the Docker daemon rather than at a per-container level, so it is an all or nothing approach. This may change in the future though.
As mentioned, user namespace support is available, but not enabled by default in the Docker daemon.
Namespaces (Countermeasures)
-
mnt: Keep the default propagation mode ofprivateunless you have a very good reason to change it. If you do need to change it, think about defence in depth and employ other defence strategies.
If you have control over the Docker host, lock down the mounting of the host systems partitions as I discussed in the Lock Down the Mounting of Partitions subsection of the VPS chapter of my book Fascicle 1 Holistic Info-Sec for Web Developers.
If you have to mount a sensitive host system directory, mount it as read-only:
docker run -it --rm -v /etc:/hosts-etc:ro --name=lets-mount-etc ubuntuIf any file modifications are now attempted on
/etcthey will be unsuccessful.Query
docker inspect -f "{{ json .Mounts }}" lets-mount-etcResult
[
  {
    "Type":"bind",
    "Source":"/etc",
    "Destination":"/hosts-etc",
    "Mode":"ro",
    "RW":false,
    "Propagation":""
  }
]
Also, as discussed previously, lock down the user to non-root.
If you are using LSM, you will probably want to use the
Zoption as discussed in the risks section. -
PID: By default enforces isolation from the containersPIDnamespace, but not from the host to the container. If you are concerned about host systems being able to access your containers, as you should be, consider putting your containers within a VM -
net: A network namespace is a virtualisation of the network stack, with its own network devices, IP routing tables, firewall rules and ports.
When a network namespace is created the only network interface that is created is the loopback interface, which is down until brought up.
Each network interface, whether physical or virtual, can only reside in one namespace, but can be moved between namespaces.
When the last process in a network namespace terminates, the namespace will be destroyed, destroy any virtual interfaces within it, and move any physical network devices back to the initial network namespace, not the process parent.
Docker and Network NamespacesA Docker network is analogous to a Linux kernel network namespace.
When Docker is installed, three networks are created
bridge,hostandnull, which you can think of as network namespaces. These can be seen by running:docker network lsNETWORK ID NAME DRIVER SCOPE 9897a3063354 bridge bridge local fe179428ccd4 host host local a81e8669bda7 none null localWhen you run a container, if you want to override the default network of
bridge, you can specify which network in which you want to run the container with the--networkflag as the following:docker run --network=<network>The bridge can be seen by running
ifconfigon the host:docker0 Link encap:Ethernet HWaddr 05:22:bb:08:41:b7 inet addr:172.17.0.1 Bcast:0.0.0.0 Mask:255.255.0.0 inet6 addr: fe80::42:fbff:fe80:57a5/64 Scope:LinkWhen the Docker engine (CLI) client or API tells the Docker daemon to run a container, part of the process allocates a bridged interface, unless specified otherwise, that allows processes within the container to communicate to the system host via the virtual Ethernet bridge.
Virtual Ethernet interfaces, when created, are always created as a pair. You can think of them as one interface on each side of a namespace wall with a tube through the wall connecting them. Packets come in one interface and exit the other, and vice versa.
Creating and Listing Network NameSpacesSome of these commands you will need to run as root.
Create:
Syntax
ip netns add <yournamespacename>Example
ip netns add testnamespaceThis ip command adds a bind mount point for the
testnamespacenamespace to/var/run/netns/. When thetestnamespacenamespace is created, the resulting file descriptor keeps the network namespace alive and persisted. This allows system administrators to apply configuration to the network namespace without fear that it will disappear when no processes are within it.Verify it was added
ip netns listResult
testnamespaceHowever, a network namespace added in this way cannot be used for a Docker container. In order to create a Docker network called
kimsdockernetrun the following command:# bridge is the default driver, so not required to be specified docker network create --driver bridge kimsdockernetYou can then follow this with a
docker network ls
to confirm that the network was added. You can base your network on one of the existing network drivers created by Docker, the bridge driver is used by default.
bridge: As seen above with theifconfiglisting on the host system, an interface is created called docker0 when Docker is installed. A pair of veth (Virtual Ethernet) interfaces are created when the container is run with this--networkoption. Thevethon the outside of the container will be attached to the bridge, the othervethis put inside the container’s namespace, along with the existing loopback interface.
none: There will be no networking in the container other than the loopback interface which was created when the network namespace was created, and has no routes to external traffic.
host: Uses the network stack that the host system uses inside the container. Thehostmode is more performant than thebridgemode due to using the hosts native network stack, but also less secure.
container: Allows you to specify another container to use its network stack.
When running:docker network inspect kimsdockernetbefore starting the container, and then again after, you will see the new container added to thekimsdockernetnetwork.
Now you can run your container using your new network:docker run -it --network kimsdockernet --rm --name=container0 ubuntuWhen one or more processes, Docker containers in this case, uses the
kimsdockernetnetwork, it can also be seen opened by the presence of its file descriptor at:
/var/run/docker/netns/<filedescriptor>
You can also see that the container namedcontainer0has a network namespace by running the following command, which shows the file handles for the namespaces, and not just the network namespace:Query Namespaces
sudo ls /proc/`docker inspect -f '{{ .State.Pid }}' container0`/ns -liahResult
total 0
1589018 dr-x--x--x 2 root root 0 Mar 14 16:35 .
1587630 dr-xr-xr-x 9 root root 0 Mar 14 16:35 ..
1722671 lrwxrwxrwx 1 root root 0 Mar 14 17:33 cgroup -> cgroup:[4026531835]
1722667 lrwxrwxrwx 1 root root 0 Mar 14 17:33 ipc -> ipc:[4026532634]
1722670 lrwxrwxrwx 1 root root 0 Mar 14 17:33 mnt -> mnt:[4026532632]
1589019 lrwxrwxrwx 1 root root 0 Mar 14 16:35 net -> net:[4026532637]
1722668 lrwxrwxrwx 1 root root 0 Mar 14 17:33 pid -> pid:[4026532635]
1722669 lrwxrwxrwx 1 root root 0 Mar 14 17:33 user -> user:[4026531837]
1722666 lrwxrwxrwx 1 root root 0 Mar 14 17:33 uts -> uts:[4026532633]
If you run
ip netns list
again, you may think that you should be able to see the Docker network, but you will not, unless you create the following symlink:ln -s /proc/`docker inspect -f '{{.State.Pid}}' container0`/ns/net /var/run/netns/container0 # Don't forget to remove the symlink once the container terminates, # else it will be dangling.If you want to run a command inside of the Docker network of a container, you can use the
nsentercommand of theutil-linuxpackage:# Show the ethernet state: nsenter -t `docker inspect -f '{{ .State.Pid }}' container0` -n ifconfig # Or nsenter -t `docker inspect -f '{{ .State.Pid }}' container0` -n ip addr show # Or nsenter --net=/var/run/docker/netns/<filedescriptor> ifconfig # Or nsenter --net=/var/run/docker/netns/<filedescriptor> ip addr showDeleting Network NameSpaces
The following command will remove the bind mount for the specified namespace. The namespace will continue to persist until all processes within it are terminated, at which point any virtual interfaces within it will be destroyed and any physical network devices if they were assigned, would be moved back to the initial network namespace, not the process parent.
Syntax
ip netns delete <yournamespacename>Example
ip netns delete testnamespaceTo remove a docker network
docker network rm kimsdockernetIf you still have a container running, you will receive an error:
Error response from daemon: network kimsdockernet has active endpoints
Stop your container and try again.It also pays to understand container communication with each other.
Also checkout the Additional Resources.
-
UTSDo not start your containers with the--utsflag set tohost
As mentioned in the CIS_Docker_1.13.0_Benchmark “Sharing the UTS namespace with the host provides full permission to the container to change the hostname of the host. This is insecure and should not be allowed.”. You can test that the container is not sharing the host’s UTS namespace by making sure that the following command returns nothing, instead ofhost:docker ps --quiet --all | xargs docker inspect --format '{{ .Id }}: UTSMode={{ .HostConfig.UTSMode }}' -
IPC: In order to stop another untrusted container sharing your containers IPC namespace, you could isolate all of your trusted containers in a VM, or if you are using some type of orchestration, that will usually have functionality to isolate groups of containers. If you can isolate your trusted containers sufficiently, then you may still be able to share the IPC namespace of other near by containers. -
user: If you have read the risks section and still want to enable support for user namespaces, you first need to confirm that the host user of the associated containersPIDis not root by running the following CIS Docker Benchmark recommended commands:ps -p $(docker inspect --format='{{ .State.Pid }}' <CONTAINER ID>) -o pid,userOr, you can run the following command and make sure that the
usernsis listed under theSecurityOptionsdocker info --format '{{ .SecurityOptions }}'Once you have confirmed that your containers are not being run as root, you can look at enabling user namespace support on the Docker daemon.
The
/etc/subuidand/etc/subgidhost files will be read for the user and optional group supplied to the--userns-remapoption ofdockerd.The
--userns-remapoption accepts the following value types:uiduid:gidusernameusername:groupname
The username must exist in the
/etc/passwdfile, thesbin/nologinusers are also valid. Subordinate user Id and group Id ranges need to be specified in/etc/subuidand/etc/subuidrespectively.
“The UID/GID we want to remap to does not need to match the UID/GID of the username in/etc/passwd”. It is the entity in the/etc/subuidthat will be the owner of the Docker daemon and the containers it runs. The value you supply to--userns-remapif numeric Ids, will be translated back to the valid user or group names of/etc/passwdand/etc/groupwhich must exist, if username, groupname, they must match the entities in/etc/passwd,/etc/subuid, and/etc/subgid.
Alternatively, if you do not want to specify your own user and/or user:group, you can provide thedefaultvalue to--userns-remap, and a default user ofdockremapalong with subordinate uid and gid ranges that will be created in/etc/passwdand/etc/groupif it does not already exist. Then the/etc/subuidand/etc/subgidfiles will be populated with a contiguous 65536 length range of subordinate user and group Ids respectively, starting at the offset of the existing entries in those files.# As root, run: dockerd --userns-remap=defaultIf
dockremapdoes not already exist, it will be created:/etc/subuid and /etc/subgid<existinguser>:100000:65536 dockremap:165536:65536There are rules about providing multiple range segments in the
/etc/subuid,/etc/subgidfiles, but that is beyond the scope of what I am providing here. For those advanced scenario details, check out the Docker engine reference. The simplest scenario is to use a single contiguous range as seen in the above example, this will cause Docker to map the hosts user and group Ids to the container process using as much of the165536:65536range as necessary. For example, the host’s root user would be mapped to165536, the next host user would be mapped to container user165537, and so on until the 65536 possible Ids are all mapped. Processes run as root inside the container are owned by the subordinate uid outside of the container.
Disabling user namespace for specific containers
In order to disable user namespace mapping, on a per container basis, once enabled for the Docker daemon, you could supply the--userns=hostvalue to either of therun,execorcreateDocker commands. This would mean the default user within the container was mapped to the host’s root.
Read-only Containers
In order to set up read-only hosts, physical or virtual, there is a lot of work to be done, and in some cases, it becomes challenging to stop an Operating System writing to some files. I discussed this in depth in the subsections “Partitioning on OS Installation” and “Lock Down the Mounting of Partitions” in the VPS chapter of my book: Fascicle 1 of Holistic Info-Sec for Web Developers. In contrast, running Docker containers as read-only is trivial.
Running a container with the --read-only flag stops writes to the container.
This can sometimes be a little to constraining, as your application may need to write some temporary data locally. You could volume mount a host directory into your container, but this would obviously expose that temporary data to the host, and also other containers that may mount the same host directory. To stop other containers sharing your mounted volume, you would have to employ labeling with the likes of LSM and apply the Z suffix at volume mount time.
A better, easier and simpler solution would be to apply the --tmpfs flag to one or more directories. --tmpfs allows the creation of tmpfs (appearing as a mounted file system, but stored in volatile memory) mounts on any local directory, which solves the problem of not being able to write to read-only containers.
If an existing directory is specified with the --tmpfs option, you will experience similar behaviour to that of mounting an empty directory onto an existing one. The directory is initially empty, any additions or modifications to the directories contents will not persist past container stop.
The following is an example of running a container as read-only with a writeable tmpfs /tmp directory:
docker run -it --rm --read-only --tmpfs /tmp --name=my-read-only-container ubuntuThe default mount flags with --tmpfs are the same as the Linux default mount flags, if you do not specify any mount flags the following will be used:
rw,noexec,nosuid,nodev,size=65536k
runC and Where it Fits in
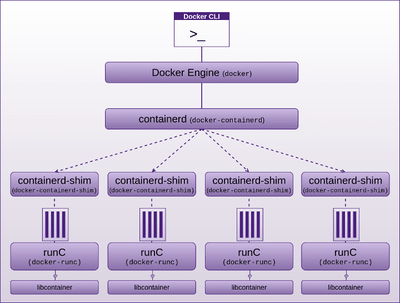
Docker engine is now built on containerd and runC. Engine creates the image indirectly via containerd -> runC using libcontainer -> and passes it to containerd.
containerd (daemon for Linux or Windows):
containerd is based on the Docker engine’s core container runtime. It manages the complete container life-cycle, managing primitives on Linux and Windows hosts such as the following, whether directly or indirectly:
- Image transfer and storage
- Container execution and supervision
- Management of network interfaces
- Local storage
- Native plumbing level API
- Full Open Container Initiative (OCI) support: image and runtime (runC) specification
containerd calls containerd-shim which uses runC to run the container. containerd-shim allows the runtime, which is docker-runc in Docker’s case, to exit once it has started the container, thus allowing the container to run without a daemon. You can see this if you run
ps aux | grep docker
In fact, if you run this command you will see how all the components hang together. Viewing this output along with the diagram below, will help solidify your understanding of the relationships between the components.
runC is the container runtime that runs containers (think, run Container) according to the OCI specification, runC is a small standalone command line tool (CLI) built on and providing interface to libcontainer, which does most of the work. runC provides interface with:
- Linux Kernel Namespaces
- Cgroups
- Linux Security Modules
- Capabilities
- Seccomp
These features have been integrated into the low level, light weight, portable, container runtime CLI called runC, with libcontainer doing the heavy lifting. It has no dependency on the rest of the Docker platform, and has all the code required by Docker to interact with the container specific system features. More correctly, libcontainer is the library that interfaces with the above mentioned kernel features. runC leverages libcontainer directly, without the Docker engine being required in the middle.
runC was created by the OCI, whose goal is to have an industry standard for container runtimes and formats, attempting to ensure that containers built for one engine can run on other engines.
If you’re working with Docker, you owe it to yourself to get this book.
At this stage, it’s only $9 NZ, get your self a copy before I realise it’s too cheap.
As always, let me know if there’s anything you don’t understand, or submit a pull request or open an issue if you find any errors. 😃
Additional Resources
The following are the additional resources in the Docker Security book.
Cisecurity
has an excellent resource for hardening docker images, which the Docker Security team helped with. The CIS Benchmark for Docker should be consulted in parallel to reading my Docker Security book
I also conducted an interview called “Docker Security"
for Software Engineering Radio in which Docker Security Team Lead Diogo Monica appeared as guest and provided some excellent advice, opinions, and food for thought, be sure to listen to it
Network Namespace source code
https://github.com/torvalds/linux/blob/master/net/core/net_namespace.c
IP-NETNS man page
http://man7.org/linux/man-pages/man8/ip-netns.8.html
Introducing Linux Network Namespaces
http://blog.scottlowe.org/2013/09/04/introducing-linux-network-namespaces/
Network namespaces
https://blogs.igalia.com/dpino/2016/04/10/network-namespaces/
docker network
https://docs.docker.com/engine/reference/commandline/network/
Namespaces in operation
https://lwn.net/Articles/580893/
dockerscan may be worth keeping an eye on for offensive testing
https://github.com/cr0hn/dockerscan
Docker SELinux Man Page
https://www.mankier.com/8/docker_selinux
Increasing Attacker Cost using Immutable Infrastructure
https://diogomonica.com/2016/11/19/increasing-attacker-cost-using-immutable-infrastructure/
Diogo Monica on Mutual TLS
https://www.youtube.com/watch?v=apma_C24W58
Diogo Monica on Orchestrating Least Privilege
- https://www.youtube.com/watch?v=xpGNAiA3XW8
- https://www.slideshare.net/Docker/orchestrating-least-privilege-by-diogo-monica-67186063
Comparison of secrets across orchestrators
https://medium.com/on-docker/secrets-and-lie-abilities-the-state-of-modern-secret-management-2017-c82ec9136a3d#.f6yba66ti
Description of how PKI automatically gets setup in swarm
https://docs.docker.com/engine/swarm/how-swarm-mode-works/pki/
Image signing, and why it is important
https://blog.docker.com/2015/08/content-trust-docker-1-8/
Docker security scanning (content integrity)
https://blog.docker.com/2016/05/docker-security-scanning/
Kim Carter
Technologist / Engineer, Information Security Professional
Technologist / Engineer, Information Security Professional, Entrepreneur and the founder of BinaryMist Ltd and PurpleTeam-Labs. Ex OWASP NZ Chapter Leader of eight years. Certified Scrum Master. Facilitator, mentor and motivator of cross functional, self managing teams. With a solid 20 years of commercial industry experience across many domains.
Say something
Your email is used for Gravatar image and reply notifications only.Subscribe to new blog posts here.
Thank you
Your comment has been submitted and will be published once it has been approved.
Click here to see the pull request you generated.
Comments
Craig Rowland